We thoroughly assess all products before recommending them. We may be compensated if you choose to buy through links on our site.
Question: How Long Should You Let Lip Stains Sit?
Answer: For a sheer tint, allow your lip stain to sit for 30-60 seconds. For a bolder, longer-lasting color, let it sit for 3-5 minutes before blotting. The longer the application time, the deeper the final stain will be.
Timing Your Lip Stain Application
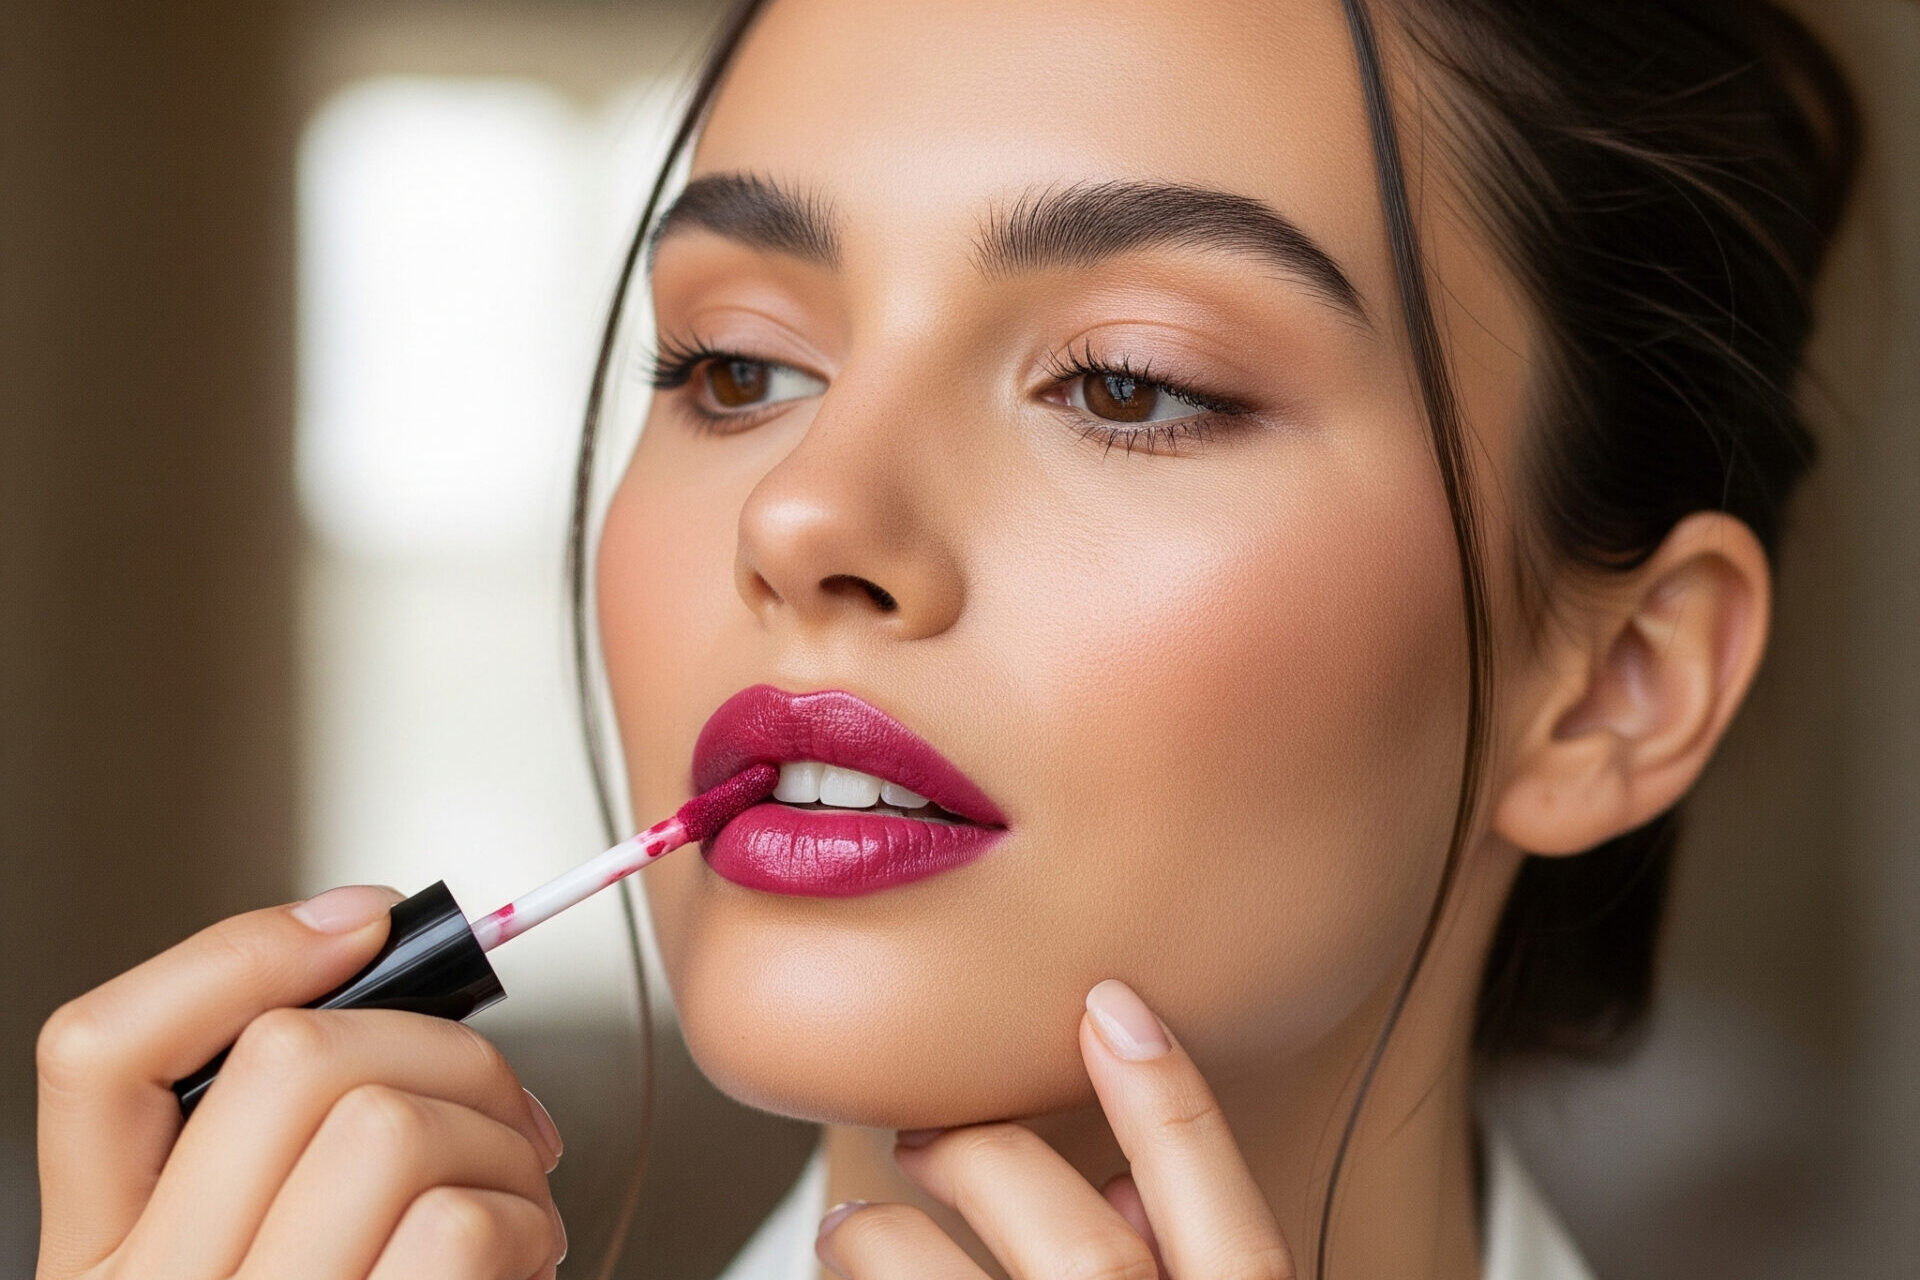
You found the perfect shade of lip stain. It promises a gorgeous, long-lasting tint that will survive your morning coffee and afternoon snack. You apply the vibrant color, and then the critical question arrives. How long should you let the lip stain sit before blotting or peeling? This waiting period is the secret to achieving that perfect popsicle-stained pout versus a patchy, uneven mess. The timing is not a universal constant. It changes based on the product’s formula, the color intensity you want, and even the condition of your lips. We will explore the precise timing needed to master your lip stain application. Get ready to achieve a flawless, transfer-proof color that lasts all day.

Top Lip Stain for 2025
Lip Stain
From gentle toning to intense color correction, these lip stains offer targeted solutions for blonde and highlighted hair...
Understanding Different Lip Stain Formulas
Lip stains are not all created equal. Their unique formulas dictate their application and the necessary waiting time for optimal results. The most common type is the water-based or gel-based stain. These products use water or a light gel as a carrier for the pigments. When you apply them, the water or gel evaporates, leaving the dye to penetrate the top layers of your skin. These stains feel lightweight and often buildable. For these formulas, the sitting time is relatively short. You can achieve a light tint in as little as 30 seconds to one minute.
For a more vibrant and saturated color, you should let the product sit for three to five minutes before blotting away any excess. Leaving it on longer allows the pigment to set more deeply, which enhances its longevity. Always apply these to dry, clean lips because any moisture can dilute the product and cause an uneven finish. The key is to work quickly and evenly, as these formulas dry fast.
Another popular category is the peel-off lip stain. These have a thicker, gel-like consistency that you apply in a generous layer across your lips. Unlike traditional stains, you do not blot these. You let the gel dry completely into a film. This process typically takes between five and fifteen minutes. The drying time depends heavily on the thickness of your application layer. A thicker coat gives a more intense color but requires a longer wait. You will know it is ready when the gel is no longer tacky and feels like a smooth, rubbery film. The magic happens when you peel it off, revealing a vibrant and incredibly long-lasting stain. It is crucial to let it dry completely. Peeling it off too soon will result in a patchy application and a sticky residue. This type of stain provides the most durable color, often lasting for twelve hours or more without fading or transferring.
Related Article: How Do You Take a Lip Stain Off?
Related Article: Is Lip Stain Safe?
The General Rules of Lip Stain Timing
While product formulas vary, some general principles can guide your application timing. The most important factor you control is the desired color intensity. Your wait time directly impacts how deep and rich the final stain will appear. A quick application and blot will always yield a softer, more natural look. A longer wait gives the pigments more time to absorb into your lips for a bolder finish. You can think of it as customizing your color every time you apply it. This flexibility is one of the best features of a quality lip stain. You can wear a sheer wash of color to the office and deepen it for a night out without carrying multiple products.
Here is a simple breakdown to help you time your application for the perfect result:
-
For a Sheer, Natural Tint
If you want a “my lips but better” look, your wait time will be minimal. Apply a single, thin layer of a traditional water or gel stain. Let it sit for about 60 seconds. After a minute passes, gently press a tissue against your lips to blot away any excess product. This technique leaves behind a soft, diffused wash of color that looks effortless and natural. It is perfect for daytime wear or for people who prefer a more subtle enhancement. This quick method is also great if you are in a hurry but still want a polished look. -
For a Bold, Saturated Color
For a more dramatic and statement-making lip, you will need more patience. Apply an even layer of the lip stain, making sure to cover your entire lip surface. Let the product sit for at least five to ten minutes. Do not press your lips together during this time, as this can cause the color to become patchy. After the time is up, blot gently with a tissue. For even more intensity, you can apply a second layer and repeat the waiting process. This layering technique builds a deep, rich color that is incredibly long-lasting and transfer-proof. It ensures your lip color remains vibrant for hours.
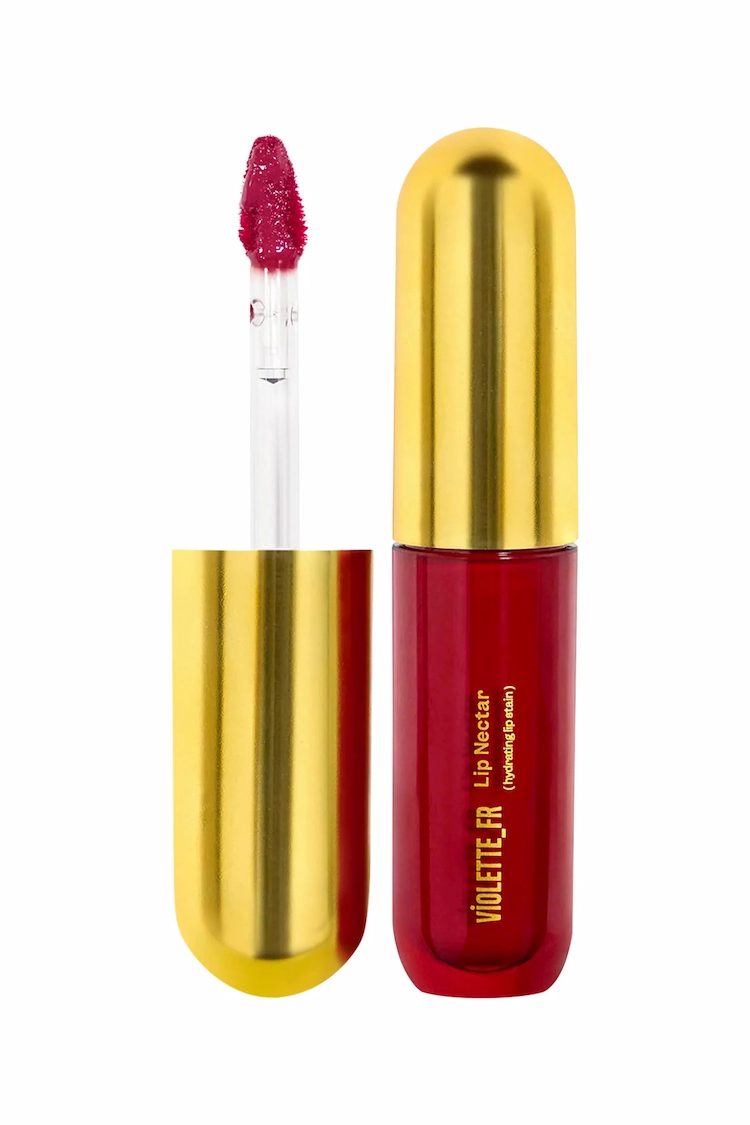
Violette_FR Lip Nectar Hydrating Lip Stain
Best Overall

Clarins Hydrating Water Lip Stain
Best Hydrating

Yves Saint Laurent The Inks Vinyl Cream
Best Shine
Mastering the Unique Peel-Off Stain
Peel-off lip stains offer a completely different application experience with spectacular, long-lasting results. These innovative products require a specific technique and a longer waiting period than traditional stains. The process begins with applying a thick, opaque layer of the gel formula. Do not be shy with the product. A thin layer will be difficult to peel and may result in a weak, uneven stain. You want to apply enough so that you cannot see your natural lip color through the gel. Use the applicator to carefully trace your lip line first, then fill in the rest. A precise outline is essential because the stain will set exactly where you place the gel. Keep your mouth slightly open and still while it dries to avoid smudging the product or creating cracks in the film.
The drying phase is the most critical part of using a peel-off stain. You must let the product sit until it is completely dry to the touch. This can take anywhere from five to fifteen minutes, depending on the product’s formula and how thickly you applied it. Resist the temptation to touch it or press your lips together. You will know it is ready when the surface is smooth, non-tacky, and has a slight sheen. Once it is fully dry, you can start peeling. Begin from one corner of your mouth and gently pull the film off in a single piece if possible. The reveal is incredibly satisfying. You will find a beautiful, even stain left behind on your lips. The color is completely transfer-proof and can last all day with no need for touch-ups. Finish with a clear balm for hydration and comfort.
Factors That Influence Your Stain’s Setting Time
Several factors can affect how long you should let your lip stain sit. Understanding these variables will help you achieve a consistently flawless application every time. Paying attention to these details elevates your technique from amateur to expert. Small adjustments based on these conditions can make a significant difference in the final look and longevity of your lip color. Think of it as fine-tuning your routine for a truly personalized result.
-
Lip Preparation and Condition
The state of your lips before application is paramount. Dry, flaky lips will absorb stain unevenly, leading to a patchy finish. The pigment will cling to dry patches, making them look darker than the rest of your lips. To prevent this, always start with a smooth canvas. Gently exfoliate your lips with a lip scrub or a soft, damp washcloth to remove any dead skin. Afterward, apply a light, non-oily lip balm and let it absorb for a few minutes. Blot away any excess balm before applying the stain. Well-hydrated lips will take the stain more evenly, although they may require a slightly longer sitting time for the pigment to penetrate. -
The Thickness of Your Application
How much product you apply directly impacts the sitting time and color payoff. A thin, sheer layer will dry very quickly, often in a minute or less. This is ideal for a subtle, natural tint. A thicker, more opaque layer contains more pigment and moisture, so it will naturally take longer to dry. This heavier application is necessary for a bold, vibrant look and is the standard method for peel-off stains. When building color, it is better to work in multiple thin layers, letting each one dry completely, rather than applying one very thick coat. This layering method gives you more control over the final intensity and ensures a more even, durable finish.
Tips for a Flawless, Enduring Finish
Achieving a perfect lip stain application that looks amazing for hours requires more than just good timing. A few extra steps in your routine will ensure your color is even, vibrant, and comfortable to wear. These professional tips help you avoid common pitfalls and make the most of your product. By incorporating these habits, you can create a beautiful lip look that feels as good as it looks and lasts through meals, drinks, and daily activities without fading or smudging.
-
Start with a Perfectly Smooth Canvas
We cannot stress this enough: lip prep is essential. Before you even uncap your stain, you must exfoliate. Use a gentle sugar scrub or a soft toothbrush to buff away any flakes or rough texture. Smooth lips provide an even surface, which allows the stain to apply uniformly without clinging to dry patches. After exfoliating, apply a hydrating lip balm. Let the balm sink in for about ten minutes, then blot away any excess residue with a tissue. You want your lips to be hydrated but not greasy. This preparation step ensures the stain adheres properly and wears off evenly throughout the day. -
Work in Careful, Thin Layers
Building your lip stain in thin layers gives you ultimate control over the color intensity. Instead of applying one thick, heavy coat, start with a single sheer layer. Let it sit for a minute or two, then blot. Assess the color. If you want more impact, apply another thin layer and repeat the process. This technique allows you to customize the shade from a soft tint to a deep, dramatic hue. It also helps the stain last longer, as multiple thin layers adhere to the lips better than one heavy coat. This method prevents the product from gathering in the fine lines of your lips and ensures a more graceful fade over time. -
Top with Balm for Comfort
Lip stains work by dyeing the top layer of your skin, which can sometimes leave your lips feeling a bit dry. Once your stain is completely set and blotted, you can apply a layer of lip balm or clear gloss on top. This adds a dose of hydration and makes your lips feel more comfortable throughout the day. A balm can also give your lips a healthy, plump appearance. Choose a balm that is not too oily, as a very greasy formula could potentially break down the stain and reduce its wear time. A simple wax-based or light cream balm is an excellent choice.
Solving Common Lip Stain Challenges
Even with careful application, you might sometimes face issues like patchiness or bleeding. Luckily, most common lip stain problems are easy to prevent and fix. Knowing how to troubleshoot these little mishaps will give you the confidence to wear bold lip stains without worry. With the right techniques, you can correct mistakes and ensure your lip color looks impeccable from the moment you apply it until you are ready to take it off. These solutions will help you perfect your lip stain game.
-
Correcting a Patchy or Uneven Stain
Patchiness is often the result of applying stain to dry lips or not allowing layers to dry properly. If you notice an uneven finish immediately after application, you can try to fix it. Take a small amount of stain on a Q-tip or a lip brush and carefully dab it onto the lighter patches to even out the color. If the stain has already set, your best option is to remove it and start over. An oil-based makeup remover or cleanser is most effective for breaking down the long-wearing pigments. To prevent patchiness in the future, always exfoliate and hydrate your lips before application. Also, allow each layer to sit for the recommended time before blotting or adding another coat. -
Preventing Color from Bleeding
Lip stains are less prone to bleeding than traditional lipsticks, but it can still happen, especially around the fine lines of the mouth. The best way to prevent this is to create a barrier. Before applying your stain, trace the outer edge of your lips with a clear or nude lip liner. This invisible wall will keep the color locked in place and prevent it from feathering. Applying the stain with a precise lip brush instead of the doe-foot applicator can also give you more control, helping you stay within your natural lip line. When applying, start from the center of your lips and blend the color outwards, stopping just short of your lip line. -
Handling a Drying Sensation
The long-wear nature of lip stains can sometimes lead to a dry feeling. If your lips feel tight or dehydrated after the stain has set, a hydrating top coat is your best friend. After blotting, swipe a layer of your favorite hydrating, non-oily lip balm or a clear gloss over the top. This will provide immediate comfort and moisture without compromising the stain underneath. You can reapply the balm or gloss throughout the day as needed. For extra care, treat your lips to a rich, nourishing lip mask overnight after a day of wearing a lip stain. This helps to restore moisture and keep your pout soft and healthy.
Conclusion
Ultimately, the perfect amount of time to let a lip stain sit is a personalized science. It depends entirely on the stain’s formula and the depth of color you hope to achieve. A quick minute can give you a subtle, just-bitten flush, while a patient ten-minute wait can deliver a bold, statement lip that lasts for hours. Experiment with different timings and techniques. Learn how your favorite products perform and what works best for your lips. With a little practice, you will master the art of timing and unlock the full potential of your lip stain collection, ensuring a perfect pout every single time.